As a console owner, there is no denying that newly released video games are taking up large amounts of storage space. The PlayStation 5 has an internal storage capacity that may be sufficient for many, but it’s a hassle to delete and reinstall games for others with low internet speeds. To tackle the issue, Sony released a software update last week, activating the ability for PlayStation 5 owners to expand the storage capacity of their consoles with an internal M.2 solid-state-drive.
The latest generation of gaming extended storage options with its upgrade to an M.2 SSD, but it didn’t replace previous possibilities. Meaning the traditional storage solution of connecting an external hard drive to the console is possible with a downside—gamers using an external hard drive or M.2 SSD will have to copy stored PS5 games from the device back to the console’s internal storage before playing.
An M.2 SSD uses flash-based memory storage making it faster and more reliable than the traditional hard disk drive. The increase in speed is beneficial for the performance of the PS5, and M.2 SSDs will undoubtedly be the standard for console storage moving forward.
Please feel free to take a look at the top three M.2 SSDs recommended by Sony for the PS5 based on size requirements, interface, and read speeds. In addition, choosing an SSD with a heatsink is ideal because it helps with cooling during lengthy durations of playtime.
- Seagate FireCuda 530 w/ Heatsink (500GB, 1TB, 2TB, 4TB)
- WD Black SN850 w/ Heatsink (500GB, 1TB, 2TB)
- Samsung 980 Pro (250GB, 500GB, 1TB, 2TB)
Before scrolling down to the installation steps, there are a few components needed for a successful installation: a well-lit room with a large enough table for the console, #1 Philips or cross-head screwdriver, and a small flashlight (optional).
Step #1
Make sure to power down the PS5 console completely. Then disconnect every cable and device attached to the PS5, but wait for the console to cool down.
Step #2
After the console cools, bring the console to a flat surface with a protective cover (I recommend laying down a towel or a clean blanket) and remove the base.
Step #3
Move the PS5 console so the PS logo is facing down and the power button is facing away from you.
Step #4
Use your right hand to grip the edge of the bottom-right corner and your left hand to grip the edge of the top-left corner of the cover.
Step #5
Now softly lift the plate with your right hand (do not force the plate off; if it doesn’t move easily, try again).
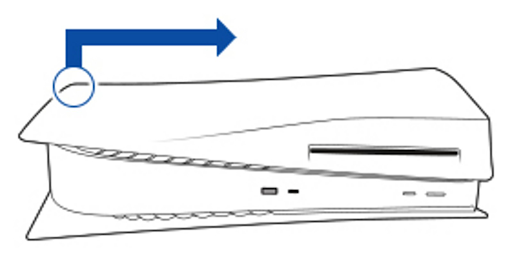
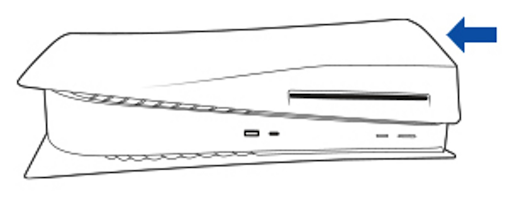
Step #6
Slide the cover off with your left thumb while using the fingers of your left hand to stabilize the console, so there isn’t any damage from a fall.
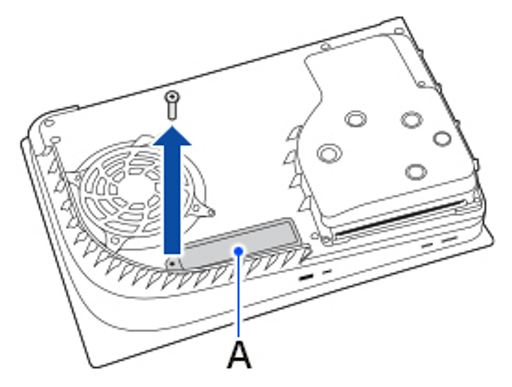
Step #7
Slowly remove the screw from the expansion slot cover (A) and then remove the cover.
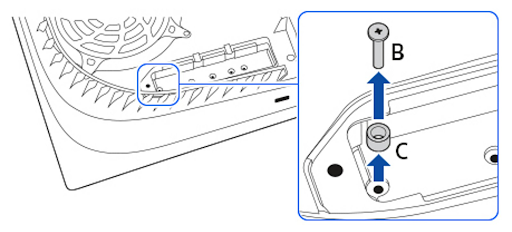
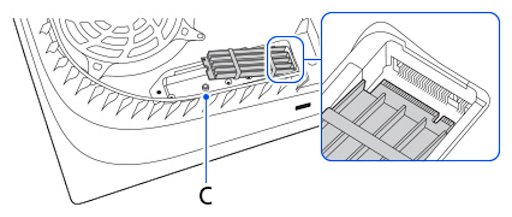
Step #8
Now safely remove the screw (B), then move the spacer (C) to the groove corresponding to the size of the M.2 SSD of choice. It’s worth noting how imperative it is not to strip the screw because I have read it is challenging to receive replacement parts from Sony.
Step #9
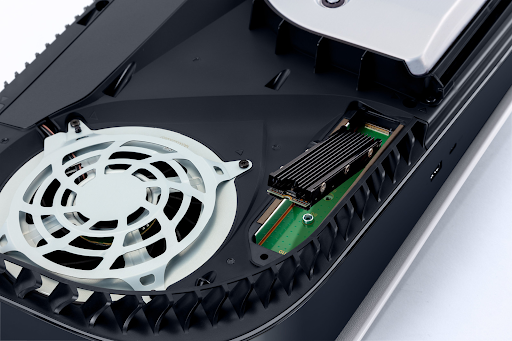
Firmly hold the edge of the M.2 SSD to align it with the notch on the expansion connector, and then place the M.2 SSD diagonally upward to insert it into the expansion slot properly.
Step #10
Tilt the M.2 SSD down gently with your index finger, then fasten it to the spacer with the provided screw from Sony to ensure no obstruction of the cooling structure.

Step #11
Now attach the expansion bay cover and fasten the screw without stripping it; if the slot cover doesn’t close properly, then the cooling structure of the SDD of choice may exceed size requirements.
Step #12
Finally, replace the plate by positioning it slightly away (about 2 cm or ¾ inch) from the top edge and sliding it back into place. If there isn’t a click sound after attaching the plate, then it isn’t adequately secured.
Step #13
Attach the base at the finish line, then reattach all cables and devices disconnected from the console before installation. After the PS5 powers on, the formatting guide will appear and follow the on-screen instructions to format the newly installed M.2 SSD.
Expanding the M.2 SSD storage in the PS5 consoles isn’t the most consumer-friendly approach, but closely following the steps will guarantee success.
Remember to keep in mind the PS5 needs to have the latest system software update released from Sony before installation. Players can head over to the console information page on the PS5 to check if it’s up to date and ready for the M.2 SSD expansion.
___
For more information or news tips, or if you see an error in this story or have any compliments or concerns, contact [email protected].