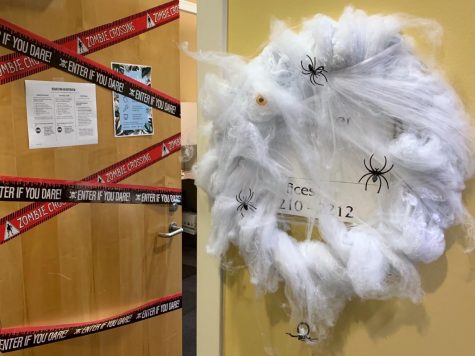
Let the Halloween decorations be the scariest part of the year, not what’s left in the bank. Learn 3 D.I.Y. (do it yourself) decorations that will add some spook wherever it’s needed and take a peek around the house or office to see what is already in the arsenal before any spending takes place. All the supplied pictured are from the local Dollar Tree and I spent less than $10. (That includes the candy too!)
Cobb web wreath ($2)
- 1 half Wreath structure
- 1 packet of webbing (spiders included)
Hold the wreath in one hand while the other hand wraps the webbing around the circular structure. Go in and out of the center of the construction to completely cover. Take the last 3 to 5 inches and tuck under previously wrapped webbing or knot if desired. Now, a stringy cotton looking wreath should be before staring back at you.
Let the creative freedom begin! Begin by pinching small amounts of cotton across the center opening. The cotton will thin as it extends across the wreath. The material doesn’t need to be anchored down because the cotton material clings to itself. Place where desired and repeat the pinching and pulling method until the ideal spider web wreath is achieved. Top it off by inviting the spiders to live in their new home. The spiders are one-size-fits-all rings so push them into the cotton. That’s a wrap! Hang your new creation anyway where!

D.I.Y. Cobb web decor
Bleeding candy bowl and candle ($2)
- Glass bowl or Battery operated candle
- 1 red crayon
- Hair dryer (borrow one if you don’t own)
*Use caution when directing the heat from blow dry toward your fingers*
Start by plugging the hairdryer into an electrical outlet and peel the paper off the crayon. Once these preparations are complete its time to make blood. Place the bowl or candle in front of you. Hold the crayon with 2 fingers vertical to the ground. Use the pointed tip of the crayon to trace the edge of the object. Hold the hairdryer in the opposite hand, pointed at the crayon, on the highest setting. Only move the crayon once a droplet of wax has dripped onto the bowl or candle. Once the entire edge is covered addition heat can be applied to further the movement of the blood, if needed. Fill the jar with the candy goods!
Hints: *Use caution when directing the heat from blow-dry toward your fingers*
Next time you go out to eat get a kid’s menu it comes with 3 crayons. That’s where my crayons came from.
Tips: First practice the way you hold the crayon while it’s melting with a different color crayon. Hold it over a piece of paper and do a test run because you only have one red crayon in most cases. Be sure to cover the surface your working on from the wax drippings.
Glowing jar of eyeballs
- Jar (with sealable lid)
- 1 pack of eyeballs
- 1 pack of glow stick bracelets
- Water (enough to fill your jar)
Snap and shake 2 glow sticks until fully illuminated. Attach the bottom ends together with the provided link connector. Place one glow ring at the bottom of the glass jar and then fill the container with eyeballs. Add water, leaving enough room for the second glow stick. Seal the deal by closing the jar. Hit the lights and watch the eyeballs light up and bobble around in the dark.
Time to sit back and sip on some witches brew!
__
For more information or news tips, or if you see an error in this story or have any compliments or concerns, contact editor@unfspinnaker.com.


